Estimate Amount of Epoxy Needed Per Square Foot
Calculate square footage for countertops by measuring the length in inches by width in inches (including edge), and divide by 144. A flood coat will require approximately 1 gallon of epoxy per 20 sq. ft. (or 6.4 ounces per sq. ft.) Divide your square footage by 20 to get the gallons required (or multiply by 6.4). You can use 4.5-6.5 ounces for your artwork layer and then do a clear full epoxy flood coat to smooth it out and protect it.
EXAMPLE: You have a 25.5 inch countertop with a 1.5 inch edge and it is 96.25 inches long. It goes wall to wall (no side edges) so you will use 27” x 96.25 = 2598.75, 2598.75 / 144 = 18.05 sq. ft. 18.05 / 20 = .9 gallons of epoxy needed. There is 128 oz. in a gallon so .9 x 128 = 115.5 ounces of epoxy needed. I always round up a little to make sure I have enough. There is a 112 oz. and a 120 oz. mark on my gallon container so I would mix 120 oz. of epoxy.
How to Mix Epoxy Resin (VERY IMPORTANT!)
- Pour Hardener into the mix bucket first
- Using a 1:1 mix ratio, pour an equal amount of Resin into a container.
- Mix thoroughly for 2-3 minutes making sure to scrape the sides and bottom of the bucket.
- Pour into a clean bucket and using a clean stir stick, mix for another 2 minutes, again making sure to scrape the sides and bottom of the bucket.
- Pour resin onto the project piece and DO NOT scrape the sides or bottom of the bucket.
If you do not follow the above instructions it is very likely that you will have inadequately mixed epoxy that will result in uncured soft and or sticky spots. It is not worth the dollar for the extra bucket to risk it! Trust me on this as I thought I could get away with it and I have. Then there is the time that I DIDN’T get away with it. Was it worth it? NO!
Step-by-step on How to Apply Expoxy Resin
- Thoroughly clean the countertop to be coated. Final Sand is recommended but not necessary.
- Sand with 80 grit making sure to soften edges.
- Grind, fill or further repair any damaged areas. (How to is discussed in class)
- Remove dust with damp paper towels and/or compressed air / and or tack cloth.
- Mask the floor and THEN cabinets allowing plastic masking to overlap paper on the floor. (Epoxy WILL transfer through even heavy floor paper!)
- Spray paint edges and over the top near the edge by about an inch at the minimum. If doing white it is recommended to spray paint the entire surface or use our primer. A few light coats is all that is needed and be sure to allow paint to flash adequately between coats. This is the weakest point of the system and LESS IS MORE! Do NOT “hose” on the spray paint as you will create a very weak system. You only need enough paint to provide coverage. If you pay attention to nothing else, please pay attention to this step!
- After the spray paint is thoroughly dry (the next day), LIGHTLY scuff sand with a maroon “Scotchbrite” pad. Make sure you do not cut through the paint or you will need to touch it up and let it thoroughly dry again before proceeding.
- Again, blow off the countertop (or damp paper towel wipe) and then tack the surface using a tack cloth.
- Mix the epoxy and colorants as you learned in the class (max 2% by volume for colorants except for white which needs a LITTLE extra). Mica powders and glitters can be used at your discretion.
- Proceed to do your pour and artwork. Open time at 70 – 75 degrees is “about” an hour depending on how long you mixed and how long it was in the mixing container.
- Proceed to torch immediately after the artwork is done. We usually will torch between 3 and 4 times with about 2 – 3 minutes between each session. You do not want to over torch or you can burn the epoxy. Use your eyeballs to determine if more torching is necessary or not.
- If using mica metallics that were sprayed on with alcohol or using spray paint for artwork, we recommend doing a flood coat of clear Enhanced U.V. epoxy over your work after it is “dust free” which means you can lightly run your finger across the surface without sticking to it but it is not yet fully cured (about 8 hours depending on temperature). The reason for this is that if you let it dry you would need to sand the surface and this would remove the metallics. Also, it is not a bad idea to do this anyway because if any damage occurs in the future, it will repair MUCH easier.
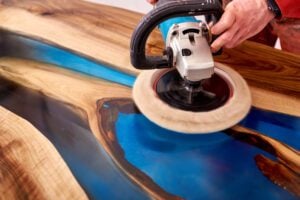
- Let epoxy cure for 3 days at a minimum of 75 degrees f. and then you can either sand the dust nibs and buff, or lightly sand any dust nibs and then use Final Sand to create a matte finish. If you want a very hard, scratch resistant surface you can sand and spray on our gloss or satin polyaspartic hard topcoat. Sand drips off the edge (we will talk about an alternative method of removing drips in class), unmask and your countertop is ready for light use. Epoxy is mostly cured in 3 days at 75 degrees but full cure does not occur for 30 days. We recommend not putting heavy things on it like coffee makers and such with small feet (higher PSI) until after 30 days or you can get impressions that are a little difficult to remove. If you need them on your countertop during the curing period it is recommended to spread the load out by placing the appliance on a flat smooth board (like particle board).
- Warmer temps. are better. If you can, crank the heat immediately after the pour at higher temps. will increase the hardness of the epoxy and keep it hot for 3 days if you can but AT LEAST keep it hot for the first 24 hours.