Let’s Make A 3D Sculpted Ursula Tumbler!
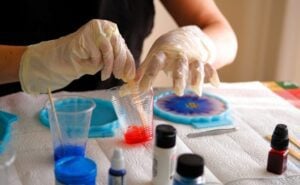
Making a 3D sculpted Ursula tumbler may seem very scary to do but I promise you, anyone can make this cup with the right materials! With this 3D tumbler tutorial, you’ll be on your way to wowing yourself and your customers! First things first, below is a list of materials you’ll need for how to make a 3D epoxy tumbler: Materials: • 1 20 ounce stainless steel tumbler • DIY Epoxy Final Sand and prep pad OR sand paper • Sculpey Air dry clay • Sculpting tools and paint brushes from any craft store • Acrylic paints: black, purple, yellow, magenta, white • Glitter: black, purple, yellow, magenta • Small cup of water • Modge Podge • MATTE Clear sealer • DIY Artisan Epoxy |
|
 | STEP ONE: Prep! This is the most important step. I personally use Final Sand by DIY Epoxy because it lessens the time it takes to prep the tumbler. Simply rub the paste on the tumbler and rub it down with the prep pad, then rinse. Wipe the tumbler dry with a paper towel and with 91% rubbing alcohol. At this point grab your cup of water, sculpting tools, and clay. | |
STEP TWO: Now we can start the fun! Take some clay out of the package, the amount depends on how thick you want the tentacles; only take out what you need as you go to prevent the clay from curing while you’re sculpting. Roll out the clay out on a flat surface until one end is narrow and pointy. Once your tentacle is ready to go, lightly wet the surface of your tumbler where you’d like to place your tentacle. Continue this process until you are happy with the amount of tentacles around your tumbler.. Do the same with the seashell necklace. |  | |
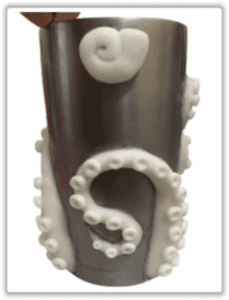 | STEP THREE: With the tentacles now placed in their final spots, dip your fingers in your cup of water and smooth out any rough areas of your clay. Once this process is complete you’re ready for SUCTION CUPS! This process is the most time consuming. Take quarter sized portions from your clay at a time and roll a few pea sized balls; these will be your suction cups. Once you have a few tiny balls of clay, lightly swipe water on the base of one tentacle where you are going to place your suction cups. Place two balls of clay, side-by-side, the use the end of a paint brush to make a circle indent in the center of the ball. This creates the suction cup look. Repeat this process to cover all of the tentacles. Let the clay dry for 24-48 hours. | |
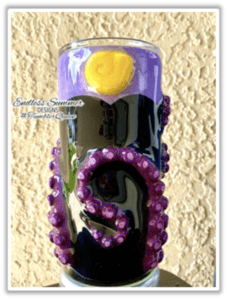
 | STEP FOUR: YOU MADE IT THROUGH! Now we can focus on the foundation of your Ursula design. I like to map out where my glitter will go with spray paint. The sections of spray paint do not have to be exact just create the “map”. Once your spray paint is dry, you can use a pencil to draw out the front of Ursula’s dress and the back line of her dress. Make sure to remember to those nice curves she has! | |
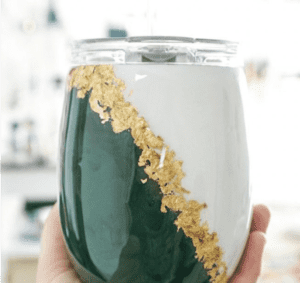
STEP FIVE: My favorite part of the process is making Ursula come to life with GLITTER!. You can do a traditional Ursula design or put your own spin on it. For this tumbler I chose to do the traditional Ursula. When you prepare your modge podge, make sure you are splitting it up for each glitter color you’ll be using as you’ll need to add your acrylic paint to your modge podge. I recommend starting with the darkest glitter color first and the lightest color last. You’ll need two coats of glitter. Let your glitter fully dry and seal it with clear matte sealer so your glitter doesn’t spread or move.. | 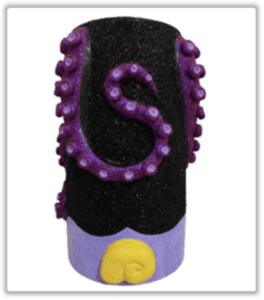 | |
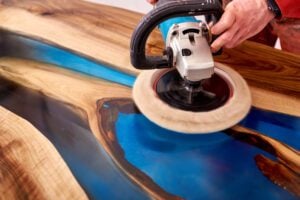
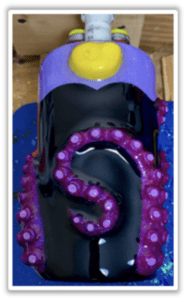 | STEP SIX: This is the second most importantly of the process J Black glitter catches EVERY imperfection and with that said, the way you put your epoxy on will determine if you get micro bubbles. After a lot of trial and error, this is what works for me: epoxy the glitter AROUND the tentacles first. Do a good coat of epoxy but not as much as you would for a flood coat. Take your time applying the epoxy with light pressure. After 24 hours, sand the epoxy to smooth any imperfections. At this point you’ll want to carefully apply a thin layer of epoxy over the whole tumbler, starting with the tentacles and seashell. You only want two thin layers of epoxy on your clay so make sure your decals are laid and sealed before this last layer of epoxy as it will be your final coat. | |
LOOK AT YOU NOW With the steps that you followed and the materials I recommended, you should have a beautiful 3D Ursula tumbler! This is the design that made me to fall in love with 3D sculpting. I hope that these steps do the same for you as the 3D clay designs are endless!
Make sure to tag me in all of your 3D Ursula tumblers as I’m your biggest fan!
TikTok: Tumbler.Queen Instagram: _TumblerQueen
| |