Epoxy resin tables have ever-growing popularity with an expected market value of 10.3 billion by 2027. This growth is all for good reason, as the need for aesthetic and functional furniture rises.
So if you want to get in on the action for these artistic, sophisticated resin tables and have a centerpiece for your dining room or outdoor setting (and do it all yourself), read on and follow our step-by-step epoxy table guide.
What Is An Epoxy Resin Table?
An Epoxy Resin Table is a piece of furniture artistically made by combining resin and wood. Epoxy tables were first made in the United States, and the trend grew like wildfire, spreading across the globe.
The resin table’s spectacular design exudes modern elegance and warmth, hence the rapid spread of the technique. Epoxy resin tables can be used in different spaces and perfectly fit in an office, business, or home set-up.
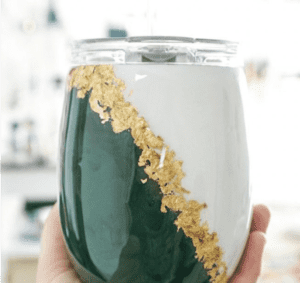
One of the great qualities of epoxy resin tables is that they are unique; no two tables are similar. You can let your imagination have a field day when combining wood and dyed resin with different colors. You may also add items in the resin such as sand, leaves, and pebbles, just to mention a few.
Which Tools and Materials Should I Use to Build an Epoxy Resin Table?
The materials and tools you will use will depend on the size of the table and your budget. Even though the materials for an epoxy table in the list below make work more manageable, you don’t technically need everything; feel free to substitute or omit some of the tools as you see fit. To find most of the tools used for constructing the epoxy resin table, click here.
- Fast-drying epoxy
- Dye starter kit
- Epoxy resin
- Fast-drying epoxy
- Dye starter kit
- Pigment pack
- Well-dried natural wood slabs
- Silicone spray
- Circular saw
- Paddle mixer
- Nitrile gloves
- Mask or respirator
- Polishing paste
- Drill with paint mixer attachment
- Sandpaper
- Caulk
- Caulk Gun
- Orbital sander
- Eye protection
- Epoxy Mold
- Propane torch
- Tape screws
- Mixing bucket
How to Choose the Right Wood for Your Epoxy Table
The quality and look of your epoxy resin table will depend on the type of wood you use. It is better to invest in excellent wood, as it will serve you longer than a cheap alternative that breaks easily. Also, keep in mind the look you would like to achieve.
Look for natural wood and possibly one with a raw edge to add more character to the project. For example, a board made of a tree trunk of at least 1.5 inches can fit the bill.
If you can’t find one board, feel free to purchase two different wooden boards that you can jigsaw into your specific design. Additionally, the wood should be dry when starting the project, with the moisture content of the wood not exceeding 12%.
How to Prepare the Wood Boards
- Cut the wood using a hand-held circular saw according to the size and shape you desire
- Ensure that the edges of the different wood pieces are of the same height.
- Use a planning machine to ensure the wooden boards are flat and have an even thickness.
If you have no experience using the above equipment, you can go to a professional carpenter to prepare and smoothen the wood boards in no time, or you can purchase flat wood boards of the desired length and thickness.
Additionally, acquiring the machines capable of processing your wood boards is quite costly, so consider your budget when deciding whether or not to do this part yourself.
What are the Perfect Conditions for Working with Epoxy Resin?
Epoxy resin is susceptible to the elements, so you need to prepare your workspace accordingly. Resin is vulnerable to high or low temperatures and humidity. Further, the drying of the substance is also affected by other external conditions like dust.
The best temperature for processing epoxy resins is usually a minimum of 20 degrees Celsius. For storage purposes, this temperature is also ideal.
When storing the epoxy resin, you are likely to place it on the floor. At room temperatures of 20 degrees Celsius, the floor temperature can be 15 to 17 degrees Celcius. Such low temperatures lead to the formation of numerous annoying bubbles, which are difficult to remove.
So it is better to store it on a shelf or workbench. Other factors in maintaining your epoxy workstation are ventilation, dryness, and a dust-free setting.
Epoxy Resin Table Guide: Step-by-Step Instructions
You can follow these steps to build your epoxy resin table. If you are unsure about any of the steps, sometimes it is easier to watch rather than read, and there are plenty of useful epoxy table guides on YouTube to help you understand.
Remove the Bark and Sand the Wood
Only thoroughly removing the residual bark does not provide a suitable bonding surface for the epoxy resin. Next, use sandpaper to work the edges and use an electric sander to smoothen the large surfaces.
Lastly, clean the wood thoroughly using a vacuum cleaner and ensure no dust is left by wiping the surface with a microfiber cloth.
Filling the Bumps and Cracks and Sealing the Wood
Use clear unpigmented epoxy resin to fill all unevenness, cracks, and porous surfaces on the wood. To correct imbalances on the wood edges, seal off these unfavorable locations with firm adhesive tape to prevent the resin from running over.
Wait for the filled-in areas to dry, then generously apply clear resin all over the wood surface. This sealing step prevents outgassing from the resin layer. Ensure the sealant dries well for about 5 hours at an ideal temperature of 18° to 24° C.
Roughen the edges of the mold that will come into contact with the cast resin using sandpaper. This step will create the perfect base for the resin to bond with the edges.
Build A Mold for The Epoxy Resin Tabletop
Next, build a mold according to the length and size of the table you desire. You can use MDF boards to achieve this by ensuring your measurements are accurate.
- Use clear sanitary silicone to seal the edges afterward to ensure that the mold is 100 % tight; otherwise, liquid epoxy resin will leak out the corners.
- Next, apply a release agent to the finished mold using adhesive tape, liquid release wax, or spraying with silicone. If you fail to do this step, the resin could adhere to the MDF boards on drying.
Insert the Wood into the Mold
Ensure the mold is resting on a 100% level work surface to avoid skewing or leakage. Push the wood into the position that you had earlier planned using several parallel clamps.
To prevent the resin from spilling over the entire table, draw a sanitary silicone barrier of 1 to 2 cm along the inner edges.
Thoroughly Mix Epoxy Resin
- First, you need to accurately calculate and measure the right amount of epoxy resin according to the manufacturer’s instructions.
- Place the contents in a sufficiently large bucket.
- Use a mixer with a drill attachment to whip the epoxy resin.
- Wait for 6-10 minutes for air bubbles to rise to the working surface,
- Remove using a blow torch or heat gun afterward.
- You can color the resin using an appropriate color pigment or maintain the crystal-clear resin.
- Then you can pour the epoxy resin on the blank spaces between the wood boards.
Remove the Casting from the Mold and Sanding
- Release the cast tabletop from the mold by removing all screws and parallel clamps.
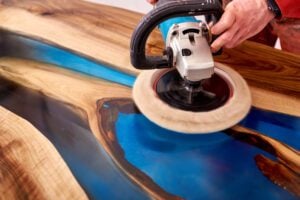
- Use an orbital sander to smoothen the epoxy table.
For perfectly smooth edges, these can be additionally processed with a router before sanding or, if necessary, cleanly re-cut or planed again with a circular saw.
Polishing and Oiling the Tabletop
This step ensures the wood is protected optimally. To achieve a natural and matte look:
- Thoroughly polish the epoxy resin table with a polishing machine.
- Apply oil evenly with a soft cloth over the entire tabletop.
What Look Do You Want to Achieve?
If you want to achieve a glossy look, you need to coat the tabletop’s surface with clear resin. Meanwhile, to get that perfect, mirror-smooth surface, you may need to commission a professional to apply a polyurethane lacquer coating.
Attach the Table Legs
The legs are like the icing on the cake for the epoxy resin table. While wooden legs bring out that rustic look, metal legs give the furniture a modern look.
More Epoxy Resin Table Tips
Now that you’re on the way to building an epoxy resin table, you need to treat it right. Avoid exposing the epoxy table to harsh UV-light conditions, as it will lead to cracks in the wood and yellowing of the resin.